By Andre / May 2, 2021
How To Set Up Dynamic DNS Using Google Domains and Ubuntu Server
Update: Google has sold their domains service. I was going to write an update article, but there is a great two part series on how to remedy the problem. Cloud Jake over at Medium (so I am not going to reinvent the wheel here) has shared a very simple solution. Part 1 and Part 2.
Dynamic DNS is a service that allows you to point your domain name at a dynamic IP address. This means that the IP address of your website changes periodically.
Google Domains offers Dynamic DNS for free with all domain purchases. You can set up Dynamic DNS using Google Domains and Ubuntu Server in under an hour.
This tutorial will show you how to set up Dynamic DNS using Google Domains and Ubuntu Server.
Table of Contents
- Table of Contents
- Why Use Dynamic DNS?
- What is Google Domains?
- Environment
- Step 1: Setup Dynamic DNS in Google Domains
- Step 2: Setup DDClient
- Step 3: Configure Your Web Server
Why Use Dynamic DNS?
Dynamic DNS is a service that allows a user to change their IP address without having to constantly update the IP address on their devices. This makes it much easier than before to make an IP address accessible from anywhere, which is useful for people who work remotely and need a reliable connection that is always available.
It is also important to note that Dynamic DNS does not require any client-side configuration. The Dynamic DNS service does all of the work for you.
What is Google Domains?
Google Domains is a domain registrar that provides users with the opportunity to register their own domain name.
Google Domains offers you the chance to get your own domain name without having to go through a third party. It also provides you with the ability to use your own personal email address, which is linked directly to your website or blog.
Benefits of Google Domains
The benefits of Google Domains are that it offers a simple interface, easy-to-use tools, and low pricing. You receive a lot of control of your domain compared to the pricing of other services like DynDNS ($24.95 a year at the time of writing) with limited features. There are free services like noip.com, but you have little no control of the domain name used and may have to verify usage every 30 days.
Google Domains provides you with a personal dashboard with all your domains, emails, and contacts. You also get Google apps integration, so you can access all your email, calendar and chat from one place.
Environment
- Ubuntu 18.04 LTS I am sure this will work on later versions, but my production servers on DigitalOcean all run this version.
- Apache 2
- ddclient 3.8.3 - Installation
- certbot 0.27.0 - Installation
Step 1: Setup Dynamic DNS in Google Domains
- Sign in to Google Domains.
- Select the name of your domain.
- Select ‘DNS’ on the left side of the screen. Default name servers must be active or this will not work.
- Click Show advanced settings.
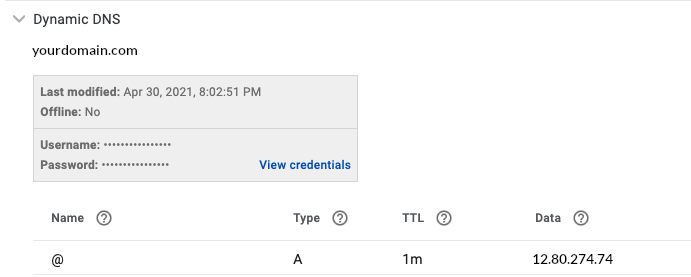
- Click Manage dynamic DNS and Create new record.
- Assign a Dynamic IP by entering the name of the subdomain or root domain.
- Click Save.
When you get to step 4 of ‘Setting up a Dynamic synthetic record’ if you want to add multiple sub-domains, this is the first change to make. Since sometimes I may share access to a finished product of something adding ‘@’ (“root domain” or “naked domain”) is the way to go. If not, add the sub-domain of your choice.
Something I considered is I can always forward a unique sub-domain,like GitHub Pages, if needed to later on. On my web server, my config files control the direction of the request. So having traffic go to the root domain location makes the most sense for me.
Complete the rest of the steps in the instructions.
Step 2: Setup DDClient
Dynamic Domain Name System is a service that automatically updates the IP address associated with a domain name, which can be useful for accessing a website that is using a dynamic IP address (e.g., for web hosting services) on the Internet. This service can be provided by DDclient, which is software that updates the computer records of domain names to reflect changes in their IP addresses.
I could not get ddclient to function correctly using the built in Google Domains support, so I opted for the instructions without Google Domains support.
# Configuration file for ddclient generated by debconf
#
# /etc/ddclient.conf

daemon=300
protocol=dyndns2
use=web
server=domains.google.com
ssl=yes
login=generated_username
password='generated_password' # see the Note below
@.your_domain.tld
Test your configuration:
Note: If you are experiencing issues here you may need to remove the single quotes
sudo ddclient -daemon=0 -debug -verbose -noquiet
You have completed the setup correctly if the output ends with “SUCCESS” - the output should be similar to:
SUCCESS: @.yourdomain.com: skipped: IP address was already set to 12.80.274.74.
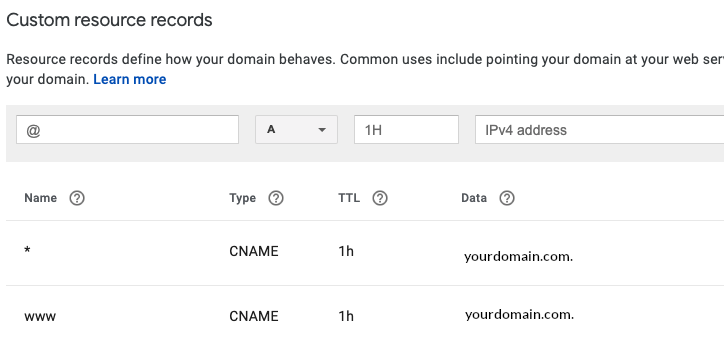
I then made sure that the URLS have propagated. Once the main URL is successful (also check with www.yourdomain.com) I then checked with random sub-domains with and without www pre-pended. After I felt good about the results, I moved to the next step.
Step 3: Configure Your Web Server
The domain that I selected ends in page so I had to have a secure connection in order for my URLS to function correctly. I won’t tell you how long it took me to figure this out, but that is why these steps are next ;-). With using the default .conf file I was ready to begin.
Repeat this process with each site/domain that you are setting up to use with your Dynamic DNS.
Copy a clean conf file:
sudo cp 000-default.conf DOMAIN_NAME.conf
Adjust file to serve the domain that it will serve:
<VirtualHost *:80>
ServerAdmin [email protected]
ServerName sub-domain.yourdomain.com
ServerAlias www.sub-domain.yourdomain.com
DocumentRoot /var/www/sub_domain
ErrorLog ${APACHE_LOG_DIR}/error.log
CustomLog ${APACHE_LOG_DIR}/access.log combined
</VirtualHost>
If You Need A Redirect
I mentioned my comic book server and of course I needed to access it with my new domain structure. So here is an example of how I added a virtual host on my server to make that a reality.
<VirtualHost *:80>
ServerAdmin [email protected]
ServerName sub-domain.yourdomain.com
ServerAlias www.sub-domain.yourdomain.com
DocumentRoot /var/www/sub_domain
ErrorLog ${APACHE_LOG_DIR}/error.log
CustomLog ${APACHE_LOG_DIR}/access.log combined

<Location />
 ProxyPass http://192.168.1.76:2202/
 ProxyPassReverse http://192.168.1.76:2022/
</Location>

<Location /admin>
 ProxyPass http://192.168.1.76:2203/admin
 ProxyPassReverse http://192.168.1.76:2203/admin
 </Location>
</VirtualHost>
Activate the site to be used:
sudo a2ensite DOMAIN_CONF.conf
Generate An SSL Certificate Using Certbot - Optional, Not Optional
I would recommend that you redirect all connections to a secure connection.
sudo certbot --apache -d nextcloud.yourdomain.com -d www.nextcloud.yourdomain.com
Your .conf file will look like the following and it will create a secure connection .conf file automatically.
<VirtualHost *:80>
ServerAdmin [email protected]
ServerName sub-domain.yourdomain.com
ServerAlias www.sub-domain.yourdomain.com
DocumentRoot /var/www/sub_domain
ErrorLog ${APACHE_LOG_DIR}/error.log
CustomLog ${APACHE_LOG_DIR}/access.log combined
RewriteEngine on
RewriteCond %{SERVER_NAME} =sub-domain.yourdomain.com [OR]
RewriteCond %{SERVER_NAME} =www.sub-domain.yourdomain.com
RewriteRule ^ https://%{SERVER_NAME}%{REQUEST_URI} [END,NE,R=permanent]
</VirtualHost>
That’s it, open your browser and go to the desired URL and you will see the site you are looking for. Let us know if you have tried this out and if it works for you.
